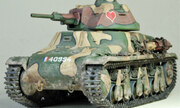
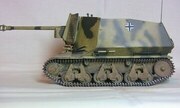
French Hotchkiss H38/39
Light Tank
Bronco | Nr. CB35019 | 1:35

Fakty
- Marka/Wydawnictwo:
- Bronco
- Tytuł:
- French Hotchkiss H38/39 Light Tank
- Numer:
- CB35019
- Skala:
- 1:35
- Rodzaj:
- Zestaw
- Wydane:
- 2008 Nowe części
- kod kreskowy:
- 4544032622725 (EAN)
- Temat:
- Hotchkiss H 35/39 » Czołgi (Pojazdy)
- Listed on:
Oznaczenia
Hotchkiss H 35/39
Hotchkiss H38
 Armée de Terre (French Army 1455-now)
Maj 1940
Olive Green overall- 1 Reg. de Cuirassiers 20
Kwiecień 1940
Brown over Olive Green - 2 Reg. de Cuirassiers 86
Maj 1940
Brown over Olive Green
Hotchkiss H39
 Wehrmacht Heer (German Army 1935-1945)
 Armée de Terre (French Army 1455-now)
1940
Brown over Olive Green
Zawartość pudełka
Ramka plastikowa, Blaszki fototrawione, Toczone z metalu, Kalkomania wodna, Metal
Wymiary:
385x245x60 mm
(15.2x9.6x2.4 inch)
Waga:
400 g (0.88 lbs)
Historia produktu
Bronco
Instrukcje
Pobierz 12303Kb (.pdf)
Giełda
No partner shops available
Recenzja zawartości
Recenzje zewnętrzne
 Przejrzeć Pete's Kits
Wszystkie recenzje » (5 razem)
Czasopisma
Wszystkie czasopisma » (5 razem)
Komentarzy
Interesting kit. Easy to build, but it did cause me some confusion while assembling it.
It includes PE, but most parts are provided in plastic so that was nice. In fact, I didn't use any of the PE, except for P2 - which failed miserably.
I could not figure out how to put the PE muffler shield (P2) in place, so I left it off. It is simply too small to wrap around the muffler and then affix to the hull. Weird.
I also left off the spare road wheel. There is some sort of bracket (B48) on the rear of the tank to which I guess the road wheel is supposed to attach to. After painting the whole kit, I went to attach the road wheel to it, and there is no way to make it fit on that piece short of clipping off all the projections on it (so why put B48 on at all at that point). I supposed it's a case of one or the other.
The pioneer tools were awkward to apply as well. They don't fit as shown in the instructions (the shovel is shown completely backwards), but there are small indentations and holes where they are supposed to go. By strategic placement of the tools, those can be hidden. The kit provides some PE straps that can be used to wrap around the tools, but they looked like like a pain to try (three tiny PE pieces that somehow form a fold to wrap around, or in lieu of, the tool) .
The instructions don't show how or where to attach the provided chain. In fact, I didn't even know about it until I was getting ready to throw out the box. Yep, I left it off.
I also didn't add the trench skid(?) either since I didn't find any pictures of it during a brief Internet search.
The individual track links weren't horrible, but they they were time consuming to clip out. I could only get three, sometimes four, to fit before requiring slow setting cement. Another time suck - and a nice crick in the neck after two days of gluing those tiny links together! The most confusing part for me was that after I painted the tracks separately and attached them to the rear idler wheels, they stuck out from under the fenders a mm or two. Since it happened on both sides, I don't think it was user error. The idler attachment parts (A11) didn't fit great in the hole on parts A37/A38 so that could have caused a bit of the problem. I suppose you could either leave parts A37/A38 off -which would be weird - and glue both parts A11 directly to the hull, or you could you could clip off the attachment peg of A11 to make a better fit of it to A37/A38. I just accepted the minor flare out since it isn't really noticeable unless someone picked up the tank and inspected it.
Silly putty is your friend while painting the camouflage pattern.
Overall, a decent kit but with some strange quirks to it. I guess I'd recommend it if you really wanted this Battle of France tank in your collection. Otherwise, I'd wait for perhaps some other company to do a better job modeling it.
24 February 2024, 03:43
Projekty
Galeria
Wszystkie artykuły » (4 razem)
Materiał referencyjny
Wszystkie książki » (3 razem) Wszystkie walkaroundy » (3 razem)
 baza danych modelowania pociągów | zarządzanie magazynem


